![]() Tue Jul 25, 2006 9:49 pm
Tue Jul 25, 2006 9:49 pm
Gradient Map Tut - Mailas
Hey guys Mailas here. Heres just a tutorial on how to use gradient maps to make cool little colorful sigs.
Some credit goes to supashay for letting me know a few things about gradient maps:
1)
First off what I need you to do is create a new document and use the following settings:

Notice where it sais resolution, if its anything lower than 72 change it to 72.
Ex: If the resolution was 1 like it is in the picture, change it to 72 or else the picture will look huge and its going to be hard to fix.
2)
Once you have done that, you should then have a layer called Background in your layers window. (press F7 to open the layers window)
We need to get rid of that layer since its locked. To unlock it, press CTRL + J on you're keyboard to duplicate the layer.
Once its duplicated, delete the Locked layer and rename the Background Copy layer to Background, thus making it unlocked.
After that press the D button on you're keyboard to set the two color pallattes to default (black and white) and press ALT + Backspace
and it should be filled black like so:

3)
Now that the image is black we now need to change the black foreground color to white.
To change it, click on the black foreground color on the bottom left of the program and a window should pop up.
This is the color picker.
Control that little square like object with you're mouse and hover it over the most whitest spot you can see.
With that done you now have to get some grunge brushes.
To get some good ones, go to http://deviantart.com and go to the browse icon.
Then go to search and type in grunge brushes. Download a good one and start brushing the black background.
Here's what I came up with:

4)
Now its time to add some color to you're design.
To do this duplicate your current layer (CTRl + J) and go to the little black and white circle on the layers window and click "Gradient Map":

Now go to the little black arrow pointing down and now click on the other black arrow pointing right and click on Color Harmonies 2.
Once you are done that look for a cool gradient you like and pick it.
For me I did the yellow and green gradient.
After that set you're gradient layer mode to Darken and duplicate it (CTRL + J)
Once its duplicated set the mode to Differrence of you're duplicated layer.
Now duplicate you're very first layer and put it on the top of all the other layers (just drag it on the layer window)
and set the layer blending mode to Soft light.
Heres my outcome:

5)
Since the background looks pretty dark we need to make it a bit brighter.
First hold down CTRL and start clicking all of the layers in your layer window to select all of them.
After that once all of you're layers are selected press CTRl + E to merge them all into one layer.
Once you have just one layer duplicate you're current layer.
If the layer is locked, duplicate it, and delete the original (explained above).
After you have duplicated it, select you're Duplicated Layer and go to Filter > Render > Lighting Effects:
69 0 -100 0 11
Style: Lighting
Light Type: Spotlight
Check the box: On
Intensity: 35
Focus: 69
Gloss: 0
Material: -100
Exposure: 0
Ambience: 11
Texture Chanell: None
Also Stretch the circle on the left to get just what you want until it looks pretty bright.
Heres my outcome:

6)
Hold CTRL and select all of the layers and then press CTRL + E to merge them into one (explained above)
Once they are merged into one layer, get out a cool render.
Im going to use a Shadow render for this.
Pop it on and then press CTRL + T and resize it to you're liking by dragging the dots on the corner and edges across the screen to make it fit on the sig.
Once you have done that, duplicate you're layer, and go to Filter > Blur > Guassian Blur and use these settings on you're duplicated render:

7)
Duplicate the Blur layer and set the blending of the layer under you're duplicated layer to Darken, and you're duplicated layer to Hue.
Now duplicate you're very first render layer and set the blending to Soft Light.
Right click on the layer you are currently on (it should be the duplicated layer of you're first layer of you're render)
and go to Blending Options and choose outer glow.
Once you are done use the typing tool (text tool) and choose you're favourite font and place you're name in.
After, use the Rectangle tool and set you're foreground colors to Default (press D on you're keyboard) and then put a tiny little rectange across you're document.
Then put that layer under you're render layers and you're text layer and set the opacity to 48. Then go to blending options and use color overlay.
Use a red color and set the blending mode of the color overlay to Linear Light.
Once you are sure you are done everything (or incase you want to come back and edit it, go to file, save as and save it as a .psd file to edit it)
then select all you're layers (you should know how to do this by now) and press CTRL + E to merge them.
Once you have you're final layer, go to the layer's blending options, and stroke it Inside at 1 or 2 px with a color of black to add a cool border.
Save it and you're done.
You're done! If you dont like the color of you're background make a complete new document and choose a differrent color on the gradient map.
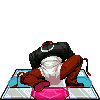
Heres my outcome, I added another layer to keep the first one company:

Note: As you can see, I tampered with the colors on my background layer. To do this, go to Color Balance on the black and white circle on the layers window, and go to Color Balance. After you have gotten you're color, toggle around with the blending options until you get something good.
Some credit goes to supashay for letting me know a few things about gradient maps:
1)
First off what I need you to do is create a new document and use the following settings:
Notice where it sais resolution, if its anything lower than 72 change it to 72.
Ex: If the resolution was 1 like it is in the picture, change it to 72 or else the picture will look huge and its going to be hard to fix.
2)
Once you have done that, you should then have a layer called Background in your layers window. (press F7 to open the layers window)
We need to get rid of that layer since its locked. To unlock it, press CTRL + J on you're keyboard to duplicate the layer.
Once its duplicated, delete the Locked layer and rename the Background Copy layer to Background, thus making it unlocked.
After that press the D button on you're keyboard to set the two color pallattes to default (black and white) and press ALT + Backspace
and it should be filled black like so:
3)
Now that the image is black we now need to change the black foreground color to white.
To change it, click on the black foreground color on the bottom left of the program and a window should pop up.
This is the color picker.
Control that little square like object with you're mouse and hover it over the most whitest spot you can see.
With that done you now have to get some grunge brushes.
To get some good ones, go to http://deviantart.com and go to the browse icon.
Then go to search and type in grunge brushes. Download a good one and start brushing the black background.
Here's what I came up with:
4)
Now its time to add some color to you're design.
To do this duplicate your current layer (CTRl + J) and go to the little black and white circle on the layers window and click "Gradient Map":
Now go to the little black arrow pointing down and now click on the other black arrow pointing right and click on Color Harmonies 2.
Once you are done that look for a cool gradient you like and pick it.
For me I did the yellow and green gradient.
After that set you're gradient layer mode to Darken and duplicate it (CTRL + J)
Once its duplicated set the mode to Differrence of you're duplicated layer.
Now duplicate you're very first layer and put it on the top of all the other layers (just drag it on the layer window)
and set the layer blending mode to Soft light.
Heres my outcome:
5)
Since the background looks pretty dark we need to make it a bit brighter.
First hold down CTRL and start clicking all of the layers in your layer window to select all of them.
After that once all of you're layers are selected press CTRl + E to merge them all into one layer.
Once you have just one layer duplicate you're current layer.
If the layer is locked, duplicate it, and delete the original (explained above).
After you have duplicated it, select you're Duplicated Layer and go to Filter > Render > Lighting Effects:
69 0 -100 0 11
Style: Lighting
Light Type: Spotlight
Check the box: On
Intensity: 35
Focus: 69
Gloss: 0
Material: -100
Exposure: 0
Ambience: 11
Texture Chanell: None
Also Stretch the circle on the left to get just what you want until it looks pretty bright.
Heres my outcome:
6)
Hold CTRL and select all of the layers and then press CTRL + E to merge them into one (explained above)
Once they are merged into one layer, get out a cool render.
Im going to use a Shadow render for this.
Pop it on and then press CTRL + T and resize it to you're liking by dragging the dots on the corner and edges across the screen to make it fit on the sig.
Once you have done that, duplicate you're layer, and go to Filter > Blur > Guassian Blur and use these settings on you're duplicated render:
7)
Duplicate the Blur layer and set the blending of the layer under you're duplicated layer to Darken, and you're duplicated layer to Hue.
Now duplicate you're very first render layer and set the blending to Soft Light.
Right click on the layer you are currently on (it should be the duplicated layer of you're first layer of you're render)
and go to Blending Options and choose outer glow.
Once you are done use the typing tool (text tool) and choose you're favourite font and place you're name in.
After, use the Rectangle tool and set you're foreground colors to Default (press D on you're keyboard) and then put a tiny little rectange across you're document.
Then put that layer under you're render layers and you're text layer and set the opacity to 48. Then go to blending options and use color overlay.
Use a red color and set the blending mode of the color overlay to Linear Light.
Once you are sure you are done everything (or incase you want to come back and edit it, go to file, save as and save it as a .psd file to edit it)
then select all you're layers (you should know how to do this by now) and press CTRL + E to merge them.
Once you have you're final layer, go to the layer's blending options, and stroke it Inside at 1 or 2 px with a color of black to add a cool border.
Save it and you're done.
You're done! If you dont like the color of you're background make a complete new document and choose a differrent color on the gradient map.
Heres my outcome, I added another layer to keep the first one company:
Note: As you can see, I tampered with the colors on my background layer. To do this, go to Color Balance on the black and white circle on the layers window, and go to Color Balance. After you have gotten you're color, toggle around with the blending options until you get something good.